Cookies

Millionaire Shortbread Cookies

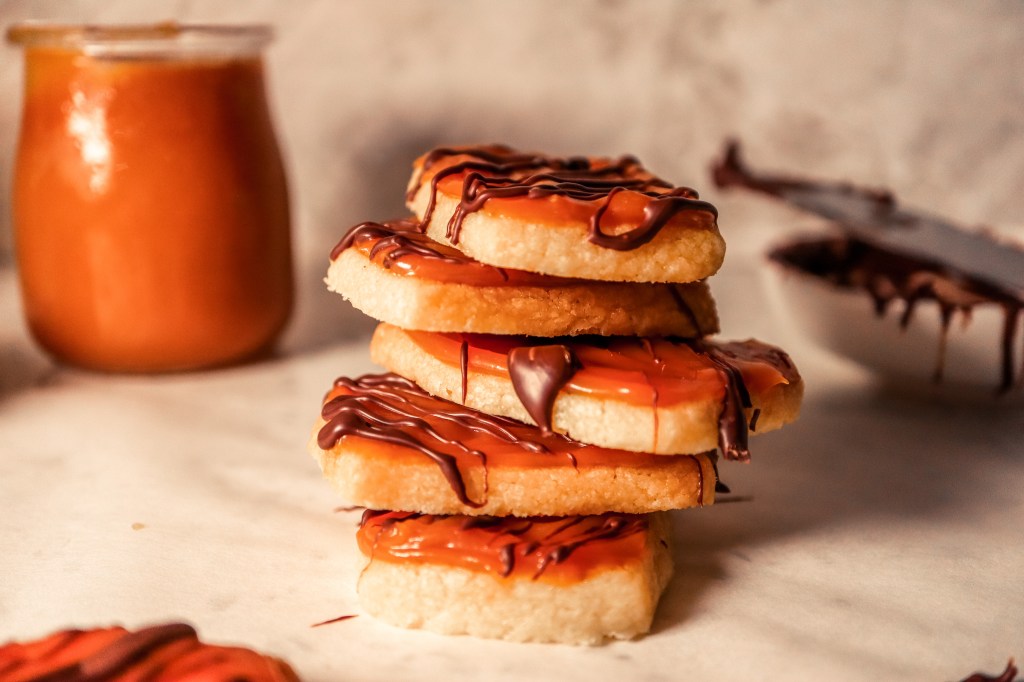
Growing up, one of my absolute favourite bakes to tuck into was Millionaire Shortbread, or Scotblock Candy Bars as we used to call them. I mean biting into it is just such a party from cracking the layer of chocolate to the smooth layer of fudge to finally that buttery melt-in-your-mouth shortbread – it’s a killer combination!

As years went by and my palate started to evolve, they now seem a bit overwhelming sweet, but I still absolutely love the combination. I therefore had to put a bit of a twist on it and create mini cookie versions, where you can easily control and vary the ratio of these amazing layers. I toned down each layer quite a bit so it’s not overwhelming, but rather just bite-fulls of sweet bliss!

It’s a bit time consuming to assemble, but this is where you can involve the kids and really have fun.

Millionaire Shortbread Cookies

Ingredients:

Caramel:

  • 200g caster sugar
  • 90g butter
  • 230ml cream, warmed slightly

Shortbread:

  • 230g softened butter
  • 50g brown sugar
  • 100g caster sugar
  • 1 tsp vanilla essence/extract
  • 1 tsp salt
  • 280g flour

Chocolate:

  • 60g good quality chocolate, melted (adjust according to your preference)

Method:

Start off by making your caramel (I would suggest making it a day before and refrigerating once cooled to give you a nice spreadable texture when assembling the cookie).

  1. Place the sugar in a saucepan on medium heat and allow to melt, stirring occasionally to distribute the heat evenly. Once the sugar has completed melted and the liquid turns an amber colour, remove from the stove and add the butter, whisking to combine.
  2. Add the slightly warmed cream and whisk until completely combined, then pour into a container and allow to cool before refrigerating for at least 8 hours, preferably overnight.
  3. Once the caramel has thickened in the fridge, it is time to make the shortbread.
  4. Preheat your oven to 165C and prepare your baking trays with baking paper.
  5. In a stand mixer, start by beating the butter for about 1 minute, until smooth. Add the sugars (caster and brown) and beat for approximately 1-2 minutes until light and creamy.
  6. On low speed, add the vanilla and once combined, add the salt and flour and mix until combined (careful not to over-mix at this point).
  7. Transfer the dough to a surface sprinkled with cornflour (to avoid it sticking to the work surface). Either place a sheet of baking paper or sprinkle cornflour on top of the dough to make it easier to roll out. Roll out the dough to your desired thickness then cut out into your desired shapes either with a cookie cutter or a knife.
  8. Place on a baking tray and bake the shortbread cookies until lightly golden on the top and around the edges, the duration will vary depending on the thickness of your cookie.
  9. Once baked, remove the cookies from the oven and allow to cool in the trays for 5 minutes before transferring to a cooling rack to cool completely.
  10. Once the cookies have cooled off, it’s time to assemble. Simply spoon the desired amount of caramel (it should be a spreadable consistency) onto the shortbread and neatly spread to create the layer of caramel on the cookie. Finally, drizzle the desired amount of melted chocolate on top of the caramel layer and store in the fridge, in an airtight container.
  11. Enjoy!!

Funfetti Cookies

With the mid-year holidays on our doorstep, we parents are seeking fun activities for our kids. Well here’s my suggestion – get them to make these really simple and delicious funfetti cookies, and best yet…you’ll get some cookies out of it! 🙂

I didn’t have the usually tub of colourful sprinkles so I gathered a bunch of left over sprinkles to make up 3/4 cup and they turned out perfectly colourful. You could also make an activity out of buying the sprinkles, get the kids to choose they favourite colours, etc.

These cookies are soft and chewy, perfect for kids (and me! I have a serious cookie dough obsession), if you’d like them a bit crunchier, just leave them in the oven for another 2minutes.

Funfetti Cookies

Ingredients:

  • 125g unsalted butter, softened
  • 3/4 cup sugar (I used Natura Sugars Golden Caster Sugar)
  • 1 egg
  • 1 1/2 teaspoons vanilla extract
  • 1 1/2 cups flour
  • 2 teaspoons maizena (corn starch)
  • 3/4 teaspoon bicarbonate of soda
  • pinch of salt
  • 3/4 cup sprinkles

Method:

  1. In the bowl of a stand mixer (fitted with the paddle attachment) cream the butter and sugar for 3-4 minutes until light and fluffy. To this butter mixture add the egg and vanilla, and beat on medium-high speed until well incorporated, approximately 2 minutes. Make sure to scrape down the sides of the bowl to ensure it is all well incorporated.
  2. To the mixture, sieve the flour, maizena, bicarb, salt, and mix until it is just combined, approximately 1 minute (don’t overmix).
  3. Here’s the fun part – add the sprinkles and using a spatula fold into the mixture until just incorporated. Again, do not overmix.
  4. Scoop the dough into balls (size according to your preference) – I used a medium sized ice cream scoop. Place them onto a tray, cling wrap and refrigerate for at least 2 hours (or up to 5 days) before baking. By allowing them to rest in the fridge and cool down it will avoid you cookies spreading to thin when baking.
  5. Preheat the oven to 175C and line two baking trays with baking paper or a silpat. Place the cooled cookie dough balls onto the tray ensuring they are spaced out. Bake for 8-10 minutes, or until the edges have set and tops are just beginning to set. These cookies are not meant to turn golden or brown at all and should stay white but if you prefer them that way, by all means do leave them slightly longer in the oven. However do remember that they firm up as they cool.
  6. Allow the cookies to cool on the baking tray for approximately 5 minutes before transferring them to a cooling rack.
  7. If stored in an airtight container at room temperature, they will last up to 1 week, or in the freezer for up to 3 months. Because you can store the cookie dough in the fridge for 5 days – bake them as you need 🙂

Choc chip, Coconut & Salted Caramel Cookies

It’s been a minute since my last post, but I’m sure you’ve been feeling it too, this manic time of year, as we try to wrap everything up before year-end, really squeeze in as much as possible so we can have some sort of stress-free holiday 🙂

Nonetheless, I’ve still been baking, more cookies than anything else, because as you may know, my passion project has kicked off and I now finally bake to sell, with a strong focus on my popular American-style cookies.

With that said, I’ve been experimenting in the land of cookies and this was just…mind blowing! OK, close your eyes and imagine this…biting into a chewy cookie and with every bite, there are chunks of chocolate and coconut and a salty-sweet surprise – salted caramel! Yum, I know! Give it a go, I promise you’ll just LOVE it!

Continue reading

Gingerbread Men

As a parent, you always try to find kid-friendly, enjoyable-for-all recipes. As a baker and a mother, I always try to find a recipe which is fuss-free and easy enough to rope the kids into – without creating too much mess and which wouldn’t flop due to the overhandling that is sure to happen due to kids excitement. Alas, I have found another recipe, perfect for kids to sharpen their baking skills with. It also has so many fun steps for them – creating the dough, pressing out the gingerbread men and later on, decorating them!

Continue reading

Chocolate Sablé Cookies

I know, I know…another cookie recipe??! It’s quite evident that my cookie jar has been overflowing this past two weeks with all the cookies I’ve been making, which includes a New York style choc chip cookie which I’ll share soon.

Sablé cookies are basically French shortbread cookies and sablé in English means sand, which you’ll completely understand when you make these cookies as the texture of the dough is sand and soil-like. Sounds strange but I promise you these cookies are one of the best you’ll ever have and are chocolate dreams with a magical texture! Have patience with these cookies as well, especially because the texture is so different, you don’t want to over-mix them as they’ll be tough, just enjoy the process and trust me it’ll all be worth while. On that note, I’m going to dig into yet another and leave you with the recipe…

Ingredients:

  • 275g plain flour
  • 40g cocoa powder
  • 3/4 teaspoon bicarbonate of soda
  • 1/2 teaspoon sea salt
  • 200g unsalted butter, diced (room temperature)
  • 50g caster sugar
  • 200g light brown sugar
  • 1/2 teaspoon vanilla extract OR 1 teaspoon vanilla essence
  • 175g good quality chocolate (to your preference – i.e. dark or milk), finely chopped

Method: 

  1. Sift the flour, cocoa powder and bicarb into a bowl and add the sea salt, then stir together and set aside.

  2. Using an electric mixer, put the butter in the mixing bowl and beat until fluffy and light. Add the sugars and vanilla and beat together for approximately 2 minutes until smooth.

  3. Add the dry ingredients to the bowl and mix until you have a mixture that looks sandy then add the chocolate and mix to combine. The dough should then look like soil; it should not have formed into one large ball of dough. This is the key to getting the correct sable cookie texture. NB: if you mix for too long the biscuits will be tough.

  4. Tip out the mixture onto a work surface and gently press together to form a uniform dough. Divide the dough into two halves and roll into two logs, 4cm thick.

  5. Wrap the dough in cling-wrap and place them in the fridge, allowing to chill for 3 hours.

  6. Preheat the oven to 180C (160C fan oven) and line baking trays with baking paper or a silpat. Remove the dough from the fridge and using a thin, sharp knife, cut into rounds about 1cm thick. Place the cookies onto the baking trays and bake for 10–12 minutes until set around the outside but still soft in the center. If you dare, because they’ll be quite hot straight out the oven of course but I definitely recommend snatching one straight out the oven – it is a melt-in-your-mouth chocolate dream.

  7. Leave the cookies to cool on the trays for 10 minutes, then transfer to a wire rack to cool completely.

  8. Once cool, leave as is or decorate according to your preference. The cookies will keep for up to one week stored in an airtight container.

  9. Enjoy!!!

file-2

Chocolate Crinkle Cookies

Looking for an easy, somewhat different chocolate cookie? These chocolate crinkle cookies definitely the answer, especially because the ingredients would most probably already be in your pantry – that’s if you, like me, are always stocked up with chocolate 🙂

Continue reading

Choc-Chip and Marshmallow Cookies

I think I’ve made cookies every weekend for the past month and I have a number of excuses lined up but the truth is, I’ve been constantly craving a good cookie. Is it just me, or is it incredibly tough to find a delicious choc-chip cookie in Cape Town?!

If you think so too, I may soon be answering your prayers as I’m planning to start selling some of my baked goods, which includes cookies (the most delicious recipes I’ve conjured).

For now, here is the recipe for the choc chip and marshmallow cookie I whipped up today. This is the sort of cookie recipe you could throw anything into really, I just happened to have some marshmallows in the cupboard, staring at me… 🙂

Continue reading

Vanilla Madeleine

Mmmm…Madeleine’s! The thought of these plump little sponge cake French cookies always makes my think of Transporter when Lai serves a fresh batch…

Continue reading

The Perfect Chocolate Chip Cookies

I know…once again it’s been quite a while…

With juggling work, kids, etc., etc. posting recipes has unfortunately fallen at the bottom of the never-ending to-do-list.

Inspiring me to continue however, is Voice of the Cape AKA VOCFM whom have kindly asked me to share recipes with their listeners each week.

Last week on the show, I shared my go-to chocolate chip cookie and oh does everyone need a go to chocolate chip cookie! I love this recipe because, if followed perfectly, you will have a buttery, chewy, chocolate chip cookie, with a chocolate chip in every bite 🙂 The great thing is, it takes just 10min to whip together!  Continue reading

Double Choc & Macadamia Cookies

Happy 2017!!!

Most who I’ve spoken have said that 2016 was a brutal year. With all that is and has happened – the heartbreaking tragedy that is Aleppo, the disgust that is Trump, etc. We are living in quite an…interesting time… Anyway let me not get into politics, 2016 wasn’t all that bad for me, I was blessed with another daughter who is the sweetest, most chilled and content baby ever! Becoming a family of four has also been quite….interesting (chaotic, completely insane and absolutely beautiful all at the same time).

Continue reading