Tag Archives: Chocolate

No Bake Biscoff, Chocolate & Mascarpone Tart

My love for Biscoff continues 🙂 I do admit that I am totally overdoing it and need to lay off the jars of Biscoff, but I just love how easy it is to work with, the flavour, the versatility – its a mildly spiced dream! 🙂

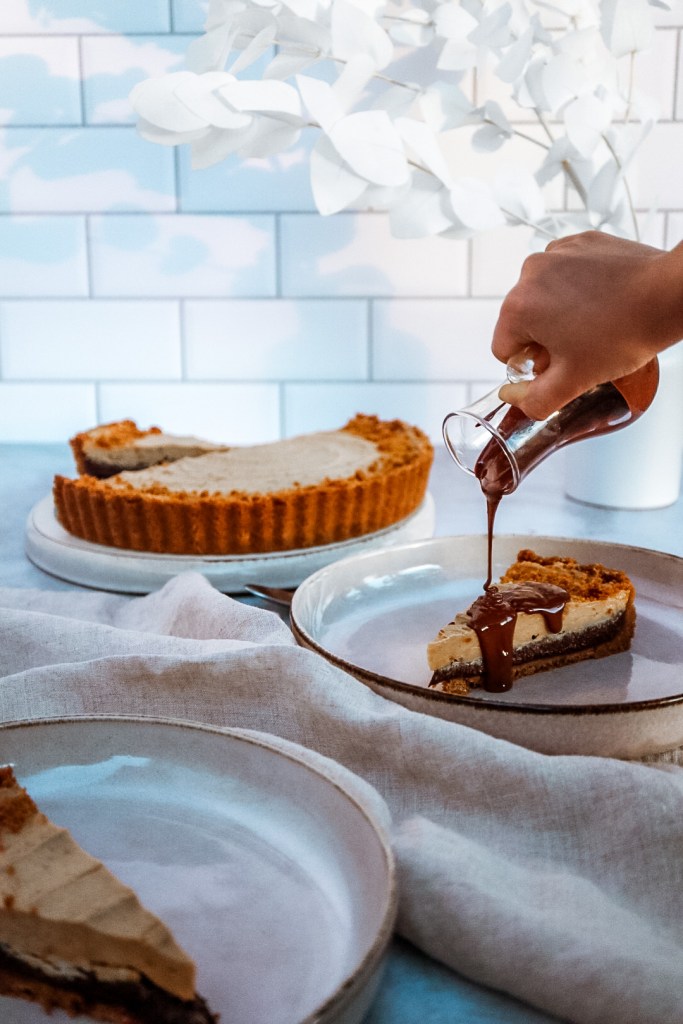
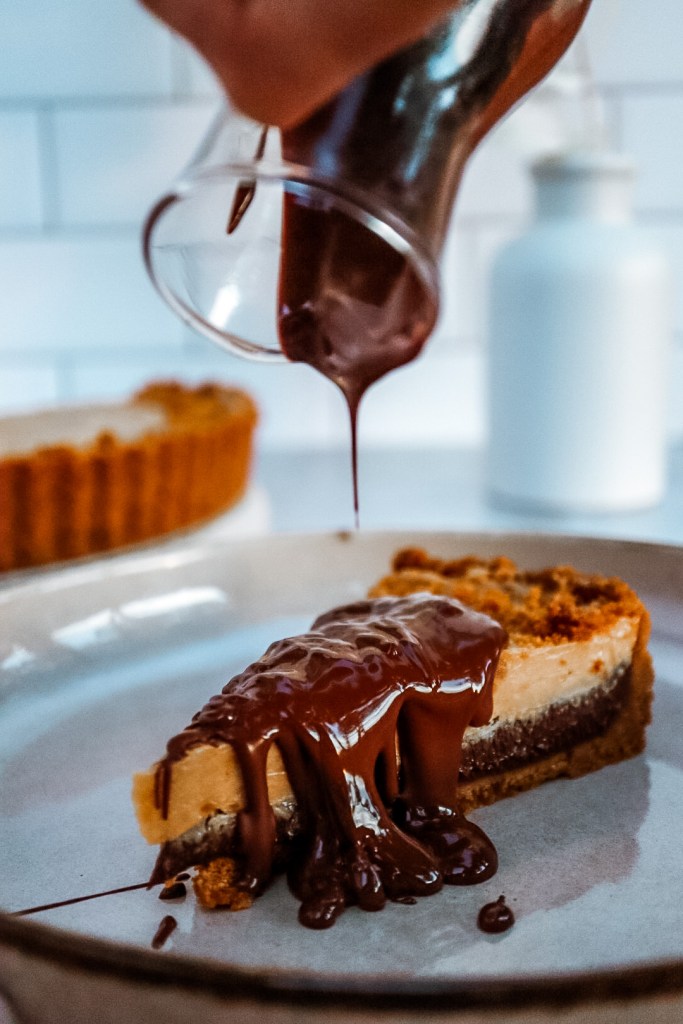
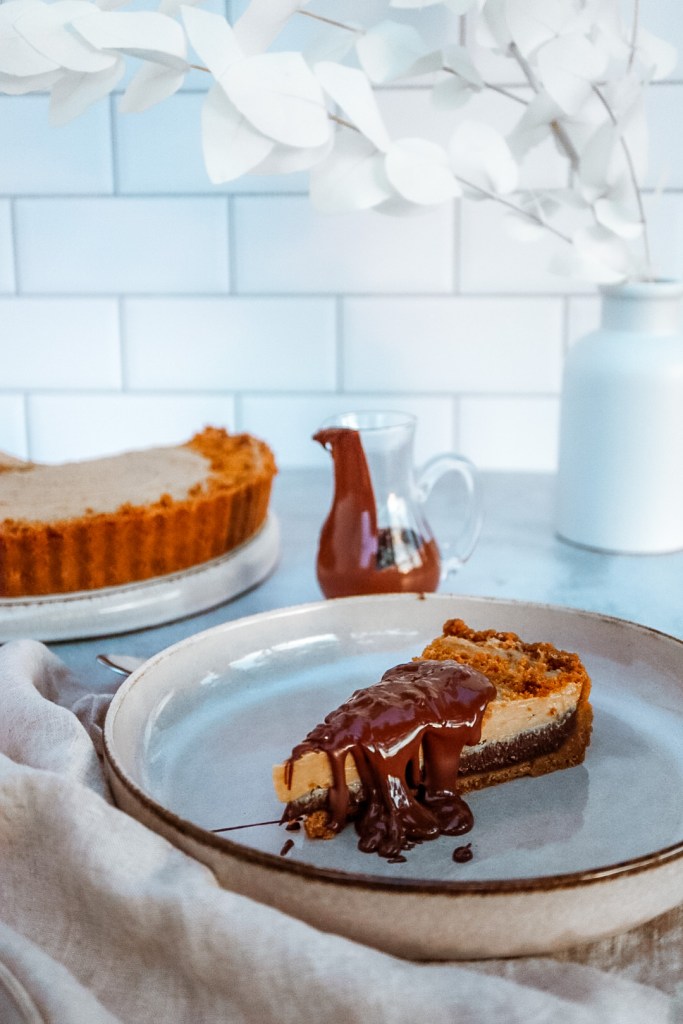
This recipe was meant to be two mousse like layers but through the recipe testing it eventually turned into this…a buttery Biscoff biscuit shell, filled with a layer of silky smooth mascarpone chocolate followed by a layer of light & airy Biscoff mascarpone mousse which can be topped with more Biscoff and chocolate 🙂 Depending on the chocolate you use, you can totally control how sweet or rich your tart is and the effort is minimal 🙂

No Bake Biscoff, Chocolate and Mascarpone Tart

Ingredients:

Base:

  • 300g Biscoff biscuits, crushed
  • 100g butter, melted

Chocolate Layer:

  • 200g chocolate, roughly chopped
  • 125g mascarpone
  • 1 tablespoon Natura Sugars golden caster sugar
  • 1 teaspoon vanilla extract
  • 300ml cream

Biscoff Mousse Layer

  • 1 cup Biscoff Spread
  • 125g mascarpone
  • 1 tablespoon Natura Sugars golden caster sugar
  • 300ml cream

Method:

For the base, grease a 25cm tart pan. Mix the crushed biscuits and melted butter then add this to and press down to line the tart pan. once neatly lined, place in the fridge while preparing the fillings.

For the chocolate layer, in a double boiler, melt the chocolate then add the remaining ingredients and gently whisk until combined. Pour the chocolate mixture into the lined tart pan and place it back into the fridge for an hour, allowing the chocolate layer to firm up.

For the Biscoff mousse layer, heat the Biscoff spread in the microwave for 20 seconds to allow it to mix easily. In a separate bowl, whip the cream and sugar until it forms soft peaks. In another mixing bowl, whisk the Biscoff spread and the mascarpone until combined then fold in the whipped cream, being carefully not to overmix. Once the chocolate layer has firmed up, spoon and spread the Biscoff mousse over the chocolate layer then pop it back into the fridge for at least six hours, allowing it to set.

Top as desired with crushed Biscoff, melted chocolate and/or more Biscoff spread.

Enjoy! xx

Chocolate on Chocolate on Chocolate muffins

I’ve had a few packets of various mini chocolates in my stash, from Crunchies to mini Mars bites, Milky Bar Buttons to Caramel Nibbles, etc. Naturally I’ve been itching to bake with them and last night this need to bake with them, sweetly coupled with an indulgent craving had me making the most chocolatey chocolate muffins just after 10pm.

Trying to think of what to name them and the only thing that could really describe it was:

Chocolate on Chocolate on Chocolate Muffins

Ingredients:

  • 2 eggs, room temperature
  • 200g caster sugar (Natura Sugars Golden Caster Sugar)
  • 125ml oil
  • 1 teaspoon vanilla essence / extract
  • 200g flour
  • 60g cocoa powder
  • 1 teaspoon baking powder
  • 1/2 teaspoon salt
  • 250ml buttermilk (can be substituted with sour cream or yoghurt)
  • 2 cups of your favourite chocolates, roughly chopped (I opted for Milky Bar Buttons, Caramel Nibbles, Mars Bites and mini Rolos)
  • 1 heaped tablespoon Biscoff, melted

Method:

  • Preheat the oven to 180C and prepare a muffin tray with muffin liners
  • Using an electric mixer, beat the eggs and sugar until pale a fluffy. While continuing to whisk, gradually add the oil and the vanilla essence until incorporated.
  • Sift the flour, cocoa, baking powder and salt and slowly add it to the mixture, alternating with the buttermilk and gently fold into the batter (do not over mix).
  • Add your selected chocolates and stir to distribute them in the batter.
  • Fill the muffins liners 3/4 way, ensuring there are chocolate chunks in each.
  • Bake in the preheated oven for 25 minutes, then remove and allow to cool for 5 minutes in the pans before transferring to a wire rack to completely cool. Drizzle with melted Biscoff or more more chocolate for an extra touch of decadence.
  • Store in an airtight container once completely cool.
  • Enjoy!

Mini Passion Fruit and Chocolate Marble Cakes

The increased time at home has created a deep need for daily tea time treats, am I right? Something quick and easy that when in the oven just fills your home with the best chocolatey aroma and hits the spot when you need to put your feet up after a manic day of juggling many hats.

Well, I’ve got the perfect tea-time treat which you could easily adapt the flavours to your preference or craving. These mini marble cakes have a delightful flavour combination of indulgent chocolate and tart passion fruit to cut through the sweetness. If passion fruit is not your vibe, you could easily omit it for a vanilla and chocolate marble cake, etc.

Ingredients:

  • 125g butter, melted and cooled
  • 125g good quality chocolate
  • 5 eggs
  • 125g caster sugar
  • 125g flour
  • 2 teaspoons baking powder
  • 1/2 teaspoon bicarbonate of soda
  • 1 teaspoon vanilla extract
  • 1 teaspoon passion fruit extract
  • juice of a half passion fruit

Method:

  1. Preheat the oven to 180C and grease a mini loaf pan.
  2. In a double boiler, melt the chocolate and then set aside to cool slightly
  3. Separate the eggs then using an electric mixer, whisk the egg yolks and sugar until pale. Pour in the cooled, melted butter and continue mixing until combined.
  4. In the egg butter mixture, sift the flour and baking powder, folding to combine, then split the mixture in two bowls.
  5. In the one bowl, add the melted chocolate to the mixture and fold to combine. In the second bowl, fold in the bicarbonate of soda, the vanilla and passion fruit extracts as well as the passion fruit juice.
  6. In a separate bowl, whisk the egg whites until stiff peaks.
  7. Split the fluffy egg whites between the two bowls (chocolate mixture and the passion fruit mixture) then gently fold to combine.
  8. Alternating between the two mixtures, spoon them into the greased mini loafs pans and once they’ve filled the tins, take a skewer and swirl them from one end to the other to create the marble effect.
  9. Bake in the preheated oven for 25-30 minutes or until a skewer come s out clean.
  10. Allow the cakes to cool in the pan for a few minutes before transferring to a wire rack to cool completely.
  11. To garnish, top with more melted chocolate and serve with passion fruit curd.

Flourless Chocolate Cake

I seriously need to get over my obsession with chocolate and raspberries…

For now however, here’s another perfect opportunity to combine this epic flavour combination! This fudgey decadent flourless chocolate cake is super simple to make and most of all just needs one bowl! Yay!

Important tip when making this, is to follow the recipe exactly – the digital scale is your bestie!

Ingredients:

  • 115g butter
  • 170g great quality chocolate (I used 55% Lindt choc), roughly chopped
  • 135g caster sugar
  • 2 tsp instant coffee
  • 1.5 tsp’s vanilla extract or essence (depending on your preference)
  • 4 eggs
  • 28g cocoa powder
  • pinch of salt
  • 1/2 tsp baking powder

Method:

  • Preheat oven to 177°C. Prepare your cake pan by greasing it fully, inserting a round disc of baking paper then greasing above the baking paper to ensure it will not stick.
  • Using a bain marie or double boiler, melt the chocolate and butter and allow to cool for 2-3 minutes.
  • Add the sugar, coffee and vanilla and whisk into the chocolate mixture. Whisk in the eggs until incorporated then whisk in the cocoa powder, salt, and baking powder.
  • Pour the batter into the prepared cake pan.
  • Place a large roasting pan, filled 2/3rds with boiling water on the bottom rack of the oven. Then place the cake pan on the middle rack of the oven and shut the door. Trust me this will make it so moist and delish!
  • Bake for 30 minutes and test with a toothpick (should come out clean with just a few most crumbs).
  • Once it comes out of the oven, allow it to cool for 10 minutes then remove and allow to cool completely. Thereafter you can pop it into the fridge or store in a airtight container.
  • Top with a sprinkling of cocoa powder and anything else you wish really. I just added some whipped cream and raspberries. Yum!

Chocolate Fondant

Just in time for the weekend, ready to impress your guests or just your tummy! Because you deserve it, you made it through January and February! 🙂 How manic have these first two months been? With all that’s happening in the world and the jam-packed kick start to the year, we need a moment. This Chocolate Fondant recipe is quick and easy and oh-so-lusciously-delicious!

If you do whip them up, please do send or tag me in the pics and let me know what you think?

Ingredients:

  • 125g butter (have some extra for greasing)
  • 1 Tblsp cocoa powder (have some extra for dusting)
  • 125g good quality chocolate, roughly chopped
  • 60g caster sugar (Natura Sugars golden caster sugar is great!)
  • 3 eggs
  • 3 egg yolks
  • 100g flour, sifted

Method:

  • Preheat the oven to 180C. Prepare your ramekins (or ovenprood moulds if you want to pop them out when plating) by greasing them with the extra butter and lightly dust them with the additional cocoa powder.
  • Melt the butter and chocolate in a bain marie or create your own bain marie by placing them in a heatproof bowl over a pan of gently simmering water (make sure the base does not touch the simmering water).
  • Using an electric whisk, beat the sugar, eggs and egg yolks until they’re pale and fluffy.
  • Pour the melted butter/chocolate mixture over the egg mix and gently fold in the sifted flour and cocoa, using a metal spoon.
  • Place the ramekins/moulds on a baking tray. Fill the prepared ramekins with the batter and bake in the preheated oven for roughly 8 minutes.
  • Once removed from the oven, they are ready to devour! The centre should be soft with a silky chocolate sauce. Serve with a scoop of your favourite ice cream, whipped cream or creme fraiche and a dusting of cocoa powder. Yum!

Salted Caramel Brownies & Toasted Meringue

My obsession with salted caramel continues…these delicious gooey brownies topped with toasted meringue has the best salted caramel surprise and is just a magical flavour combination.

If you want to make them in advance, bake the brownies and keep them airtight sealed and also make the caramel and store it in a jar in the fridge, keeping both ready until you’re ready to serve them (should preferably be within three days). Just top and toast the meringue when you’re ready to serve them and they’ll be absolutely perfect.

Continue reading

Chocolate, Salted Caramel & Banana Bread

Last night I had this strong desire to bake, not for any orders, just…selfishly…for myself…and my family of course 🙂 I wanted to whip up something quick and delicious, which I could munch on for a quick breakfast snack in the morning and definitely straight out of the oven too.

The flavours that came to mind was banana for that healthy breakfast element but that was as far as I could stretch the healthy flavouring, next was chocolate, because why not? The final flavour for pure decadence was salted caramel. Chocolate, Salted Caramel and Banana Bread was then the mission at hand 🙂

Continue reading

Choc chip, Coconut & Salted Caramel Cookies

It’s been a minute since my last post, but I’m sure you’ve been feeling it too, this manic time of year, as we try to wrap everything up before year-end, really squeeze in as much as possible so we can have some sort of stress-free holiday 🙂

Nonetheless, I’ve still been baking, more cookies than anything else, because as you may know, my passion project has kicked off and I now finally bake to sell, with a strong focus on my popular American-style cookies.

With that said, I’ve been experimenting in the land of cookies and this was just…mind blowing! OK, close your eyes and imagine this…biting into a chewy cookie and with every bite, there are chunks of chocolate and coconut and a salty-sweet surprise – salted caramel! Yum, I know! Give it a go, I promise you’ll just LOVE it!

Continue reading

Granadilla & Chocolate Bundt Cake

I’ve just returned from a blissful holiday and honestly struggling to fit baking into my routine at the moment. I’m fully back into swing at work but I’m just completely knackered in the evening – it is however almost the weekend so I’m sure my baking gloves will be dusted off and in full use again.

While I dust them off, I thought I’d share the recipe of this delicious granadilla and chocolate bundt cake, the perfect summer tea-time treat! I personally adore this flavour combination as they so perfectly compliment each other, with the granadilla cutting through the sweetness of the chocolate. The soaking of the syrup in the cake also ensures that it’s moist and decadent and the addition of semolina and ground almonds provides a unique texture that is just divine! You could either create a big or mini bundt cakes or like me, a combination of the two.

Continue reading

Chocolate Swiss Roll

Swiss roll, swiss roll…oh how intimidating you seem until you have the courage to give it a go and realise and its actually one of the easiest cakes to make. I saw this recipe posted by Mehnaaz Basha and it just looked delicious and quite quick and easy to make – when I attempted it, it was exactly that!

This swiss roll is airy, light and fluffy – everything you’d want from a swiss roll really 🙂 After I posted a picture of it on Instagram, I’ve been getting requests for a tutorial and have finally included one on my Instagram – featured in the story highlights. It’s incredibly quick to make and just like any other cake, you need it to cool down before decorating, so build in time for the cool down. Just like any chocolate cake – you can be as adventurous as you want with the filling and decorations.

Continue reading